Thursday, February 20, 2014

Goodbye my friend


Earlier this week I lost a friend to cancer. I've been thinking about her every day since I found out. Throughout the day I would forget and then my thoughts would gravitate back to her. We were high school friends and roommates during our freshman year of college. I remember our conversations about love, our dreams, korean dramas, and Youtube beauty guru stuff. We didn't see each other often, maybe once every few months for a new foodventure or lunch at our favorite restaurants (Jazz Cat Cafe or Boiling Point) to catch up on each other's lives. More importantly, every time we hung out we are always able to pick up as if we talked all the time. We shared so many common interests and I admired her for developing not one, but two cool blogs. 

She was only 25. It shouldn't be this way. I keep thinking that I would get the news that she was in remission and that she would be ok. I can't believe that she's gone. I'm a nurse, I see devastating stuff all the time but this hits so close to home. My heart hurts for her and her family. She is one of the most optimistic and strong people I know. When she told me about her diagnosis, she never once asked why this was happening to her. She took it head on and was so full of life even after her surgery. She will continue to motivate me everyday. Because of her, I will strive to live life to the fullest and not keep putting things off to do later. 

Thank you for the memories, our foodventures, and your friendship. Rest in peace, Kristine.  

Tuesday, June 18, 2013

For the love of Bánh Mì! (Vietnamese sandwiches)


Maivy's Musings- How to make Banh Mi (Vietnamese Sandwiches)


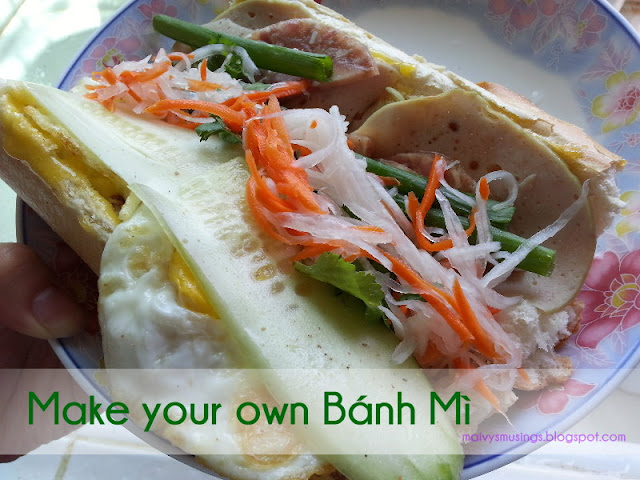
Bánh Mì or the Vietnamese sandwich is yummy goodness inside a bun with a perfect combination of fresh baked bread, Vietnamese deli meat, Vietnamese pickles, veggies, pate, and creamy bơ (Vietnamese mayonnaise)...aka heaven in a bite. This is a cheap eat easily bought but if you had time, you should try making this at home because it tastes 1000x better! I recently served bánh mì at my 25th birthday party but I cheated because my mom made the pickles and bơ. This weekend, I finally had the chance to experiment with making these and the result was delicious so I wanted to share it with you today.


If you have ever been to a bánh mì shop, you know that there are many types of bánh mì with different fillings. The one I have here today is my version of the cold cut special combo (bánh mì đặc biệt).

Ingredients for sandwiches:
French baguettes (I like mine on the soft side and I highly recommend you buying these freshly baked)
cilantro
cucumber
sliced jalapenos
headcheese (giò thủ)
Vietnamese sausage/pork roll (giò lụa )
pate spread
soy sauce

Ingredients for Vietnamese pickles đồ chua:
1 large daikon
4-5 carrots
1 teaspoon salt
1 cup sugar
2 cups water
1 cup vinegar

Ingredients for Vietnamese mayonnaise: 
3 eggs
1/2 cup extra virgin olive oil
1 teaspoon onion powder
1 teaspoon garlic powder
1/2 teaspoon sugar
1/4 teaspoon salt

1. Prepare the Vietnamese pickles because this tastes better pickled overnight.

  • Shred the daikon and carrots into thin strips
  • Wash the shreds with 1 tablespoon sugar and 1/2 tablespoon salt. Without rinsing, drain the liquid and place the shreds in a colander and let it sit for about 5 minutes
  • After 5 minutes wash the shreds with water in a vigorous manner by squeezing the portions tightly 
  • Drain and firmly squeeze the shreds to remove all the water and set aside
  • Prepare the brine. Use your judgement for how much brine to make versus how much shredded veggie you have. If it is not enough for the veggies you can double the recipe (which is what I ended up doing).
  • Place 2 cups of warm/hot water in your container or jar. Mix with 1 cup sugar, 1 cup vinegar, and 1 tsp of salt.
  • Place the veggie shreds into your container and set aside in the fridge. Đồ chua tastes better pickled at least overnight but you can enjoy it after a few hours if you wish. 
  • The flavors improve with time and your pickles can last 4-6 weeks in the fridge. 
2. Prepare the Vietnamese mayonnaise. 

(recipe and photos courtesy of my mom at Junniebites)
  • Mix 3 egg yolks with a hand mixer on low. Mix the egg yolks in one direction and slowly drizzle in the oil as you continue to mix.
  • When the egg and oil mixture thickens to the consistent you would like add the onion powder, garlic powder, sugar and salt. Mix well. And there you have it, the best buttery, garlic-y and creamy Vietnamese mayonnaise...my favorite! 
3. Prepare your sandwich components.
  • Slice your cucumbers in to thin strips.
  • Slice your jalapenos.
  • Thinly slice your Vietnamese cold cut meats.
  • Wash your cilantro.
4. Put your sandwich together.

  • Start with slicing your baguette in half length-wise.
  • Spread pate on one side and bơ on the other.
  • Fill the sandwich with your meat fillings.
  • Fill your sandwich with pickled veggies, cucumber, cilantro, and jalapeno.
  • Drizzle a bit of soy sauce on top to taste.
  • If you're feeling fancy, top with a fried egg. Highly recommended, very yummy. 

Tuesday, May 7, 2013

25!


Lien found some baby videos of us this past weekend. We spent hours watching it with mom and dad. Even though it's been 23 years since then, things are no different. I still secretly pick at foods in the kitchen when my mom isn't looking and she still asks my dad what he wants to drink with dinner. It was so much fun going down memory lane. Which reminds me why I love Instagram...I can look back a year later and see what I was doing. I love the idea of this. Finding those videos reminds me the importance of documenting life as it happens.

This post is over a week late. I will work on writing posts and keeping up with this blog in a more timely manner :)

Last week, I turned the big 2-5! It's just a number but I do feel different. It was a big milestone and I was able to celebrate it with my favorite people and my family. I'm glad Minh's family was able to come, including my favorite babies! They are so much fun :) My dad's speech nearly made me cry. We celebrated with a tea party/Vietnamese food party. It was perfect and well worth the work. To me it was less about celebrating my birthday and more about making an occasion where friends and family could gather and catch up. I very much enjoyed every minute of the party and all the hard work we put into prepping was well worth it!

It was a very Pinterest inspired event. We decorated with DIY pompoms and even made our own photobooth. My sisters and I slowly collected fun photobooth items weeks leading up to the party.


I've accomplished a lot at 25 and I can't wait to accomplish more in the future. I know the future will have a lot of exciting things in store. It already is proving to be a very good year for myself and other important people in my life who will be embarking on very exciting new adventures in the coming months. I'll be starting a 30 by 30 list soon so keep posted for that. I will also be starting a new chapter in my life come fall 2013. I'll be going back to school at Cal State Long Beach for my master's degree to become a Pediatric Nurse Practitioner! I'm very excited for that. I feel very blessed and loved. Can't wait for what the future has in store!

Sunday, April 21, 2013

Acai Bowls!


My sisters and I headed to Huntington Beach one weekend to try Ahi Poke bowls at North Shore Co. When we saw Banzai nearby, we couldn't resist the temptation of stopping to try Acai Bowls. I remember my friend Dannie talking about how good they are so we stopped to try and the rest is history! This is happiness in a bowl! We got the Maui sunset, which was an acai smoothie topped with fresh fruit, coconut flakes, granola, and a drizzle of honey. The combinating is so amazing, you've got to try it! So after making 2 trips to Banzai in a week (we live about 25-30 minutes away), I needed to find an easier way to satisfy our cravings for an acai bowl. Not to mention, one bowl at Banzai costs $8-10 dollars so I wanted to find a cheaper alternative. This is what I came up with and it tastes almost the same at a fraction of the cost. It is very simple to make and takes me about 10 minutes or less. In addition, this is very good for you because Acai is loaded with antioxidants and boasts a variety of other health benefits.                 

Ingredients for One Bowl
1/2 frozen banana
1 cup frozen mixed fruit
1/2 cup frozen berries
1 cup acai juice

Toppings
Granola
Shredded coconut
Chia seeds (optional)
fresh fruit
honey

1. Put the frozen fruits and acai juice in the blender and blend until smooth. You are looking for a consistency that is slightly thicker than a smoothie you would drink. I always have frozen fruits in the freezer for acai bowls or a green smoothie. You can get the Acai juice from Costco or you local health food store.

2. Pour the mixture into your serving bowl and top with your desired toppings. Drizzle some honey to finish and that's all there is to it! 


Tuesday, March 26, 2013

Drowning in "what-ifs"

Don't you hate it when you're presented with so many options and don't know where to even start? If you think about it, we are presented with choices every single moment of every day. It can be simple things.What should I have for breakfast? What route should I take to work? What should I wear? Should I exercise? Should I eat that cookie that's just calling out my name? And then it could be complicated. What do I want to do with my life? Should I go to graduate school?

I am the most indecisive person ever. Unless I'm having a craving for something specific...don't ask me to decided where we should have lunch because it'll be dinner time before I make up my mind. I just think way too much. As soon as I make up my mind, I think of another alternative almost immediately and that is why it takes me forever to make up my mind. Sometimes I get so frustrated at myself when I spend all day trying to make a decision and by then it's too late to get anything done. Do you want to know what's even worse? I spend all day making a decision and then end up feeling guilty about my choices or second guessing myself. The dreadful cycle just continues and nothing gets done. Drives my sister bonkers.

Lately, I have been working hard to change this bad habit. If my mind starts to think about all the alternatives, I have to mentally remind myself that there's a reason for the decision I made and I should stick to it. I think that this has already made me into a more productive person. It's a work in progress though. For example, I had several tasks to complete today before going to work. I spent a few minutes trying to rationalize with myself and push some things off until tomorrow but then had to remind myself that it's important to finish things off my to-do list. I was pretty proud that I got everything that I needed to do completed before heading to work...even if that meant not being able to watch the new episode of "Once Upon A Time" lol, there's always time for that later before heading to bed this morning.

On another note, I have suddenly learned that if you don't inquire...you won't ever receive. So I took a chance and emailed someone a question because it was better than trying to plan my future based on what my assumptions are. I need to know what's out there before I can make a choice because it makes no sense to worry about options that might not even exist. There's another thing I need to stop doing...in addition to thinking too much I also worry way too much. I'm going to work really hard at this because life is too short to waste.

Ah...I'm going to be a quarter century old next month! I can't believe it. Excited but scared at the same time.

Friday, March 22, 2013

Thai Green Shrimp Curry


Ah...green curry. One of my favorite comfort foods and I didn't know how easy it is to make! Perfection at first bite and hits just the right spot when the green curry craving hits. This was my second attempt and because I followed the recipe more closely this time, my green curry tastes exactly like what I order at my favorite Thai restaurant. I felt like changing it up a bit and had my green curry with quinoa instead of rice and it was very delicious. You can use any type of protein you have on hand, I had some shrimp defrosted so that's what I used in this curry. Get creative with the veggies you want in the curry as well. The most important component is the flavor of the curry sauce and the rest can be left to your imagination. I think that eggplant and bell peppers would go great in this dish.

Recipe adapted from RasaMalaysia @ http://rasamalaysia.com/thai-green-curry-recipe/

1/2 lb shrimp (or your choice of protein)
3 tablespoons green curry paste (Mae Ploy brand)
2 1/4 cups coconut milk
1 can thinly sliced bamboo shoots
1 can straw mushrooms
3-4 kaffir lime leaves
1/4 cup Thai basil leaves
2 teaspoons fish sauce
2 tablespoons sugar
olive oil for frying

1. Drizzle some oil on the frying pain and saute the green curry paste until fragrant.
2. Add half of the coconut milk and stir it for 1-2 minutes until incorporated. Add the kaffir lime leaves after crushing them a bit with your hands to bruise them because it will release more flavor.
3. Rinse and drain the bamboo shoots and mushrooms. Add into the pot and continue to stir.
4. Add the shrimp and continue cooking until it is cooked.
5. Add the rest of the coconut milk, fish sauce and sugar.
6. Add the basil and remove from heat. (I didn't have basil this time but the dish still turned out great, but I know it will taste even better with basil added in)

I made all this is abut 30 minutes! Like I said...had no idea that it was so easy! If you are a green curry enthusiast, you  must give this recipe a try!

Wednesday, December 12, 2012

Chewy Toffee Butter Chocolate Chip Cookies


After seeing all the yummilicious posts from last year's great food blogger cookie swap hosted by Julie from The Little Kitchen  and Lindsay from Love & Olive Oil, I knew I wanted to participate this year. Click on these two links to check out the recipe round up from last year, part 1 and part 2.

I'm ecstatic because this year, participating in this fun cookie swap also benefited a great charity  We raised over $4,000 for Cookies for Kids' Cancer. OXO matched our donations and even mailed each participate a good cookie spatula (which I was very surprised I got in the mail because I wasn't expecting it). It's one of those sweet unexpected gestures that made me smile.

The cookies were definitely fun to make and receive but my favorite part was the networking. Through participating,  I was able to discover new blogs I would not have had the fortune of stumbling upon otherwise. I'm sure I will have a lot more fun in discovering new blogs once the recipe roundup posts are up. I'll update this post with those links when they become available. Instagram was also very fun, check out #fbcookieswap for some delicious pictures.

It feels like Christmas already because I'm already having so much fun reading posts and going on a Pinterest frenzy. Check out my cookie board here.

For the cookie swap, I baked up a batch of what I like to call "Chewy Toffee Butter Chocolate Chip Cookies." They are actually called "I Want to Marry You Cookies" because the recipe maker got a proposal with these cookies. You can find the original recipe and reviews here.

After a failed attempt at making brownie cookies, I went back to the virtual drawing board and the name of these cookies caught my attention first so I decided to give it a try. The result was deliciousness! They taste like coconut, toffee and chocolate. What's not to love? Clean up is also easy because everything happens in one pot! I already have plans to recreate this recipe by adding coconut flakes and walnuts.


Chewy Toffee Butter Chocolate Chip Cookies

Yields 3 dozen cookies (depending on size)

Ingredients
1 cup butter
1 1/4 cups brown sugar
1/2 cup granulated sugar
1 egg
1 egg yolk
1 teaspoon vanilla extract
2 cups all purpose flour
1 cup uncooked rolled oats
1/2 teaspoon baking powder
1/2 teaspoon salt
1/4 teaspoon ground cinnamon
1 cup white chocolate chips
1 cup chocolate chips


1.  Melt the butter in a medium sauce pan on medium heat. Remove from heat and add the brown sugar and granulated sugar. Stir until the whole mixture is incorporated and all the sugar has melted. This process gives the cookies a toffee flavor. Chill this mixture for 10 minutes.

2. Stir in the egg, egg yolk, and vanilla extract when the mixture is cool.

3. Add the flour, oats, baking powder, salt, and cinnamon to the mixture.

4. Stir in both types of chocolate chips.

5. Line a baking sheet with foil. Using a 1 tablespoon spoon, roll into cookie dough balls and place closely on the baking sheet.

6. Chill for about 30 minutes in the freezer.

7. Preheat the oven to 325 degrees F. Remove the cookie dough balls and make for about 15-17 minutes. They won't look like they are done fresh out of the oven but when you let it cool for about 5-10 minutes, the cookies will be perfect and chewy.

I hope you enjoyed this post, I had a lot of fun baking and sending out my cookies. Waiting for cookies to arrive was also very fun and delicious!


Betsy from BetsyLife sent me some really delicious Lemon Creme Sandwich cookies.
I got some really yummy Maple Pecan Toffee Cookies from Cathy at Savory Notes.
Last but not least, I received some candy cane puffs from Teri at The Freshman Cook.

I sent cookies to Julie from Peanut Butter Fingers, Jessica from Little House Big Heart, and Emily from Pink Tiger in the Kitchen .

If you are interested in participating next year head over to this page and add yourself so that you will be notified when the cookie swap happens again next year.